Every great render can be separated into two parts – a foreground, and a background. The foreground is often the subject of your render. It’s the model you spent days making, detailing, and adding materials, layers, and textures to. The background is the environment in which your model sits. It includes the scenario, lights, and other elements that surround your model. The tragedy, however, is that 99% of your energy goes into building the foreground, but when it comes to your background, it becomes all too easy to just drag and drop an HDRI environment from your rendering software.
Making your own custom environments for 3D rendering can often be a long, laborious task, which is why most people just use template environments. Traditionally, HDRI (High Dynamic Range Images) 360° environments are captured using 360° cameras, or by taking multiple photos of an environment and stitching them together in a software. However, you can now get an AI to make you a 360° environment with just one sentence. Developed by game dev studio Blockade Labs, Skybox is a free-to-use website that makes AI-generated environments with a simple text prompt. All you do is describe the environment you want, choose from a list of visual styles, and hit Generate. In seconds, the AI creates an environment that you can preview directly on the website. You can then download the environment and easily use it in your rendering software like KeyShot 11, vastly enhancing your workflow; or even in any AR/VR experience you may be building. For now, the service is entirely free, and Blockade Labs gives you the right to ownership of all the images you create (although they get perpetual access to it), allowing you to freely use the environments or commercialize them by selling them online too.
Free KeyShot 2023 Trial: Download Now | Free KeyShot Report: Download Now
How to use Skybox AI
If you’ve ever used Google, you know everything there is to know about using Skybox. The website’s UI has just a single text box that you type your environment description prompt into and a Generate button that gets the AI working on your prompt. A drop-down menu lets you select from a variety of styles, like digital painting, realistic, sci-fi, interior, manga, watercolor, and many more, giving you control over your final output. However, most of these themes are targeted toward game developers and artists, so it’s best to stick to themes like Realistic, Interior, or Advanced (No Style) for the most photorealistic results.
When typing your prompt, more is always better. Skybox runs on a modified version of Stable Diffusion, so it’s best to be as expressive and detailed as possible with your description so that the AI doesn’t surprise you with something you didn’t ask for. Skybox lets you input prompts in two ways. A ‘Create New’ feature lets you generate something entirely new, and if you like what you’ve made but you just want to fine-tune it or change the image style, a ‘Remix This’ feature proves to be handy.
How to write your prompt
Prompt writing is an acquired skill, and if you haven’t ever used any AI tools, stick around. If you’re familiar with Midjourney or Stable Diffusion or any Text-to-image program, you can skip this part.
When writing a prompt, you need to express clearly to the AI what you’ve got in your mind. If you’re looking for a realistic road scene, specify whether it’s an urban or a highway setup, describe the scene, the time of day, and any details like the style of road you’re looking for. Throw in a few adjectives if you want. Here are a few examples, along with their results. (You can right-click and download the hi-res images)
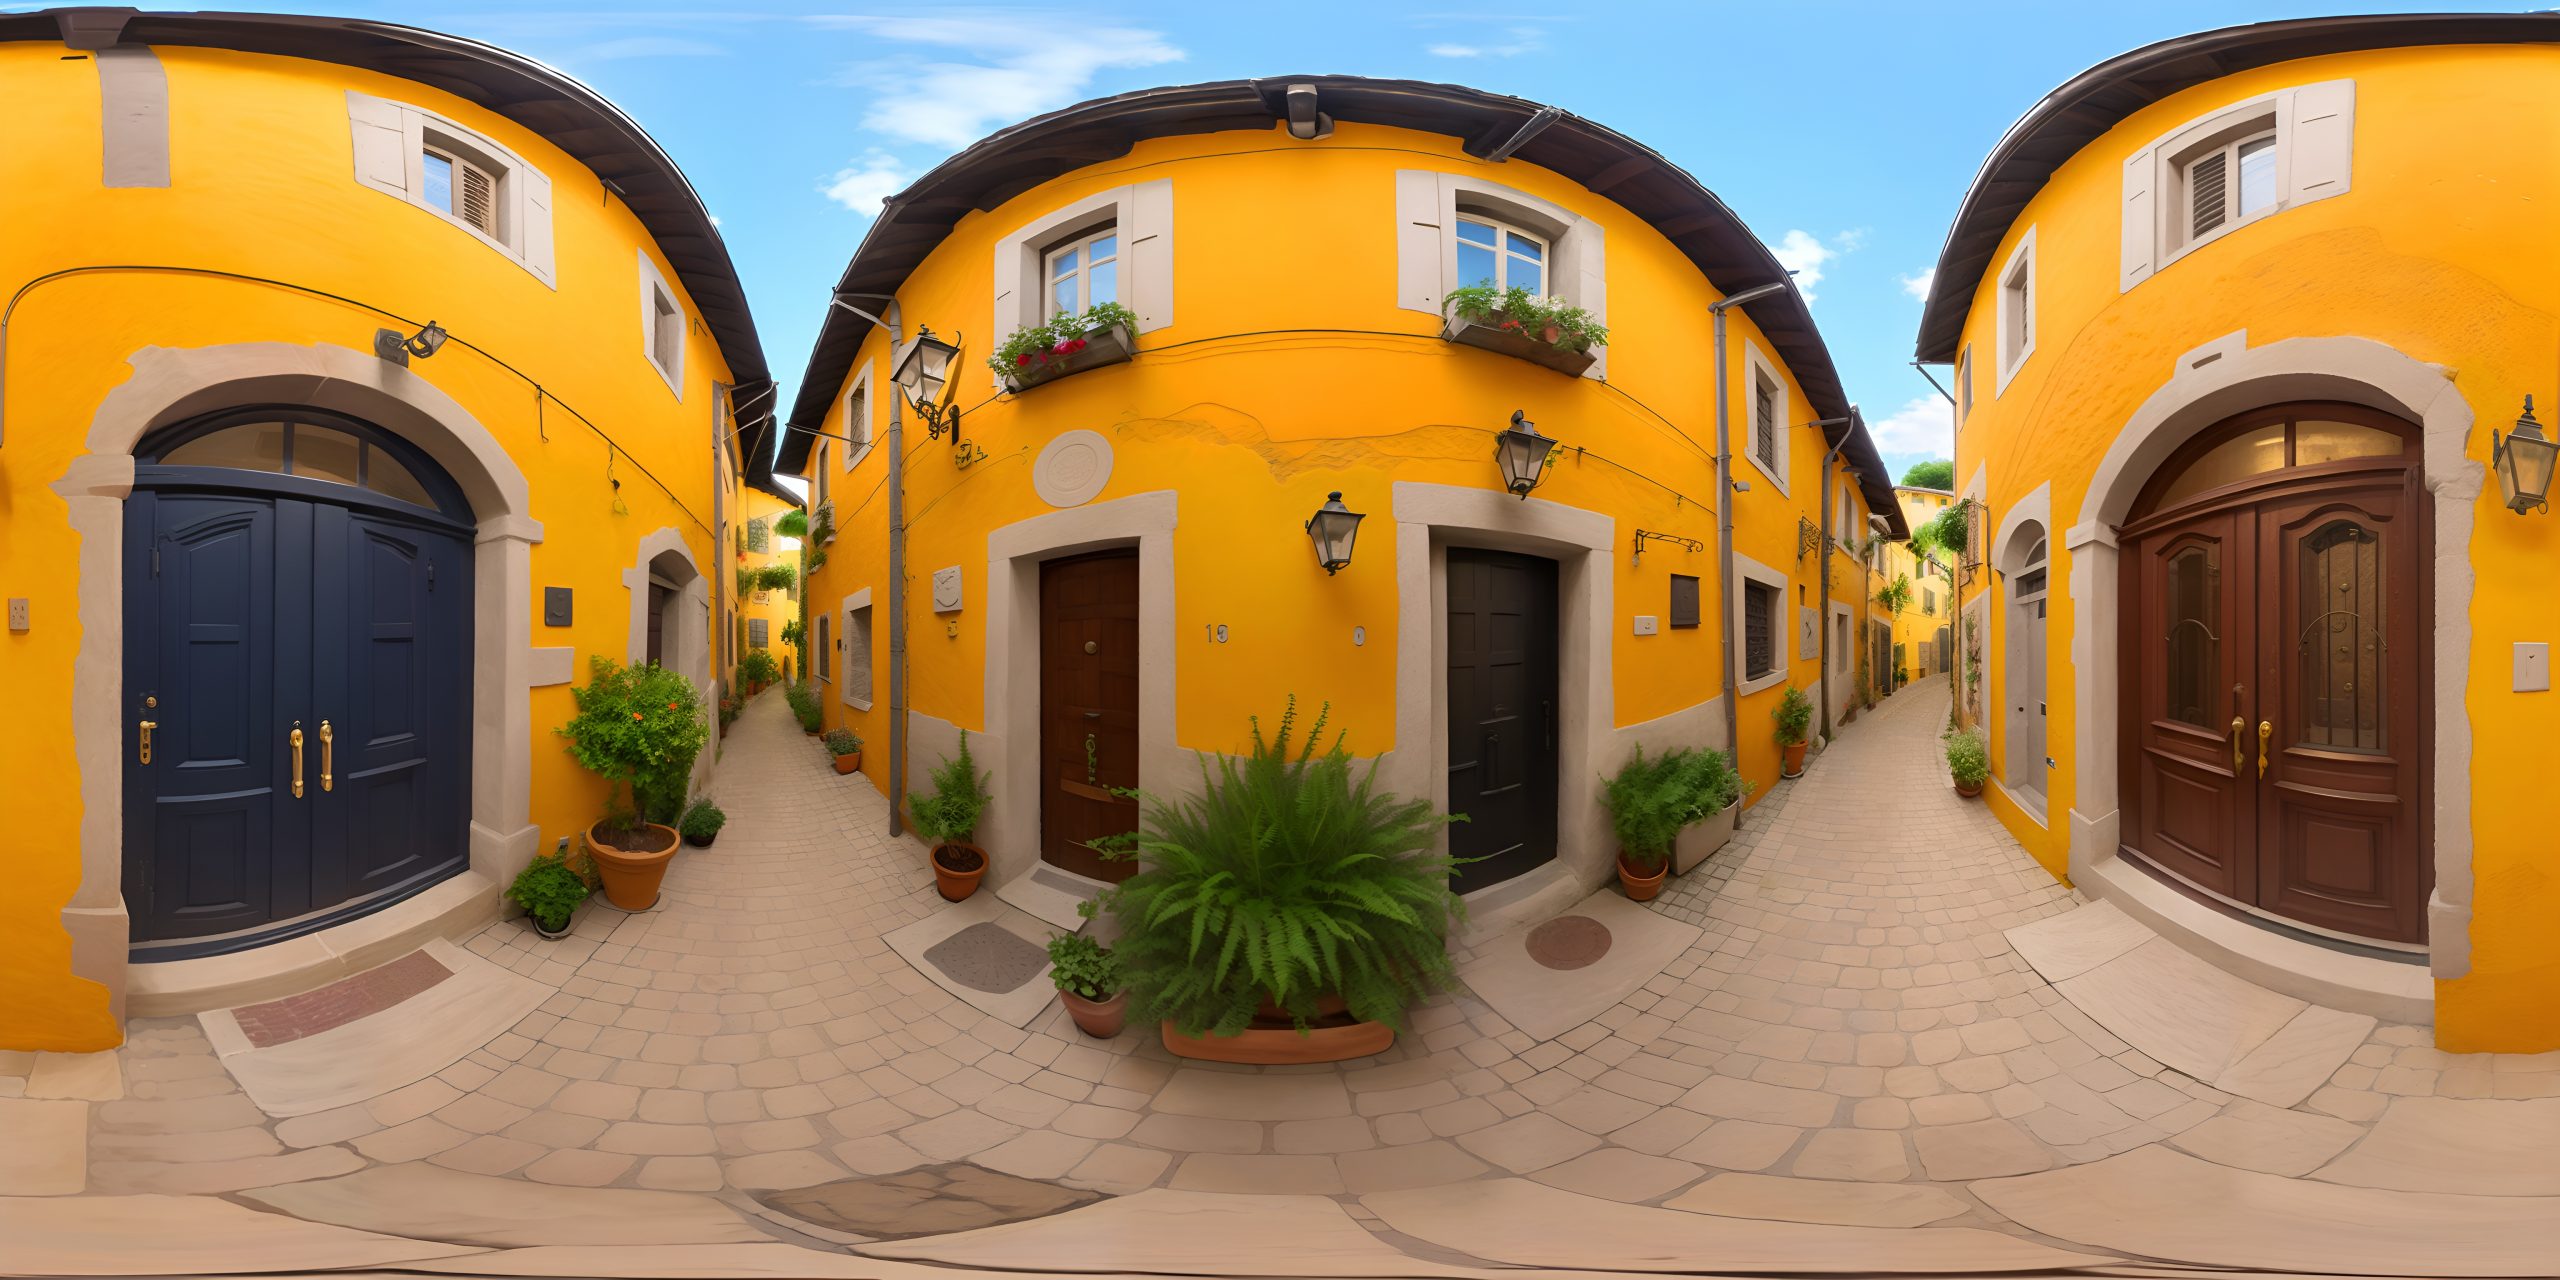
Prompt – Cobbled Stone Pathway in an Old Italian Village. Vibrant modern buildings
Style – Realistic
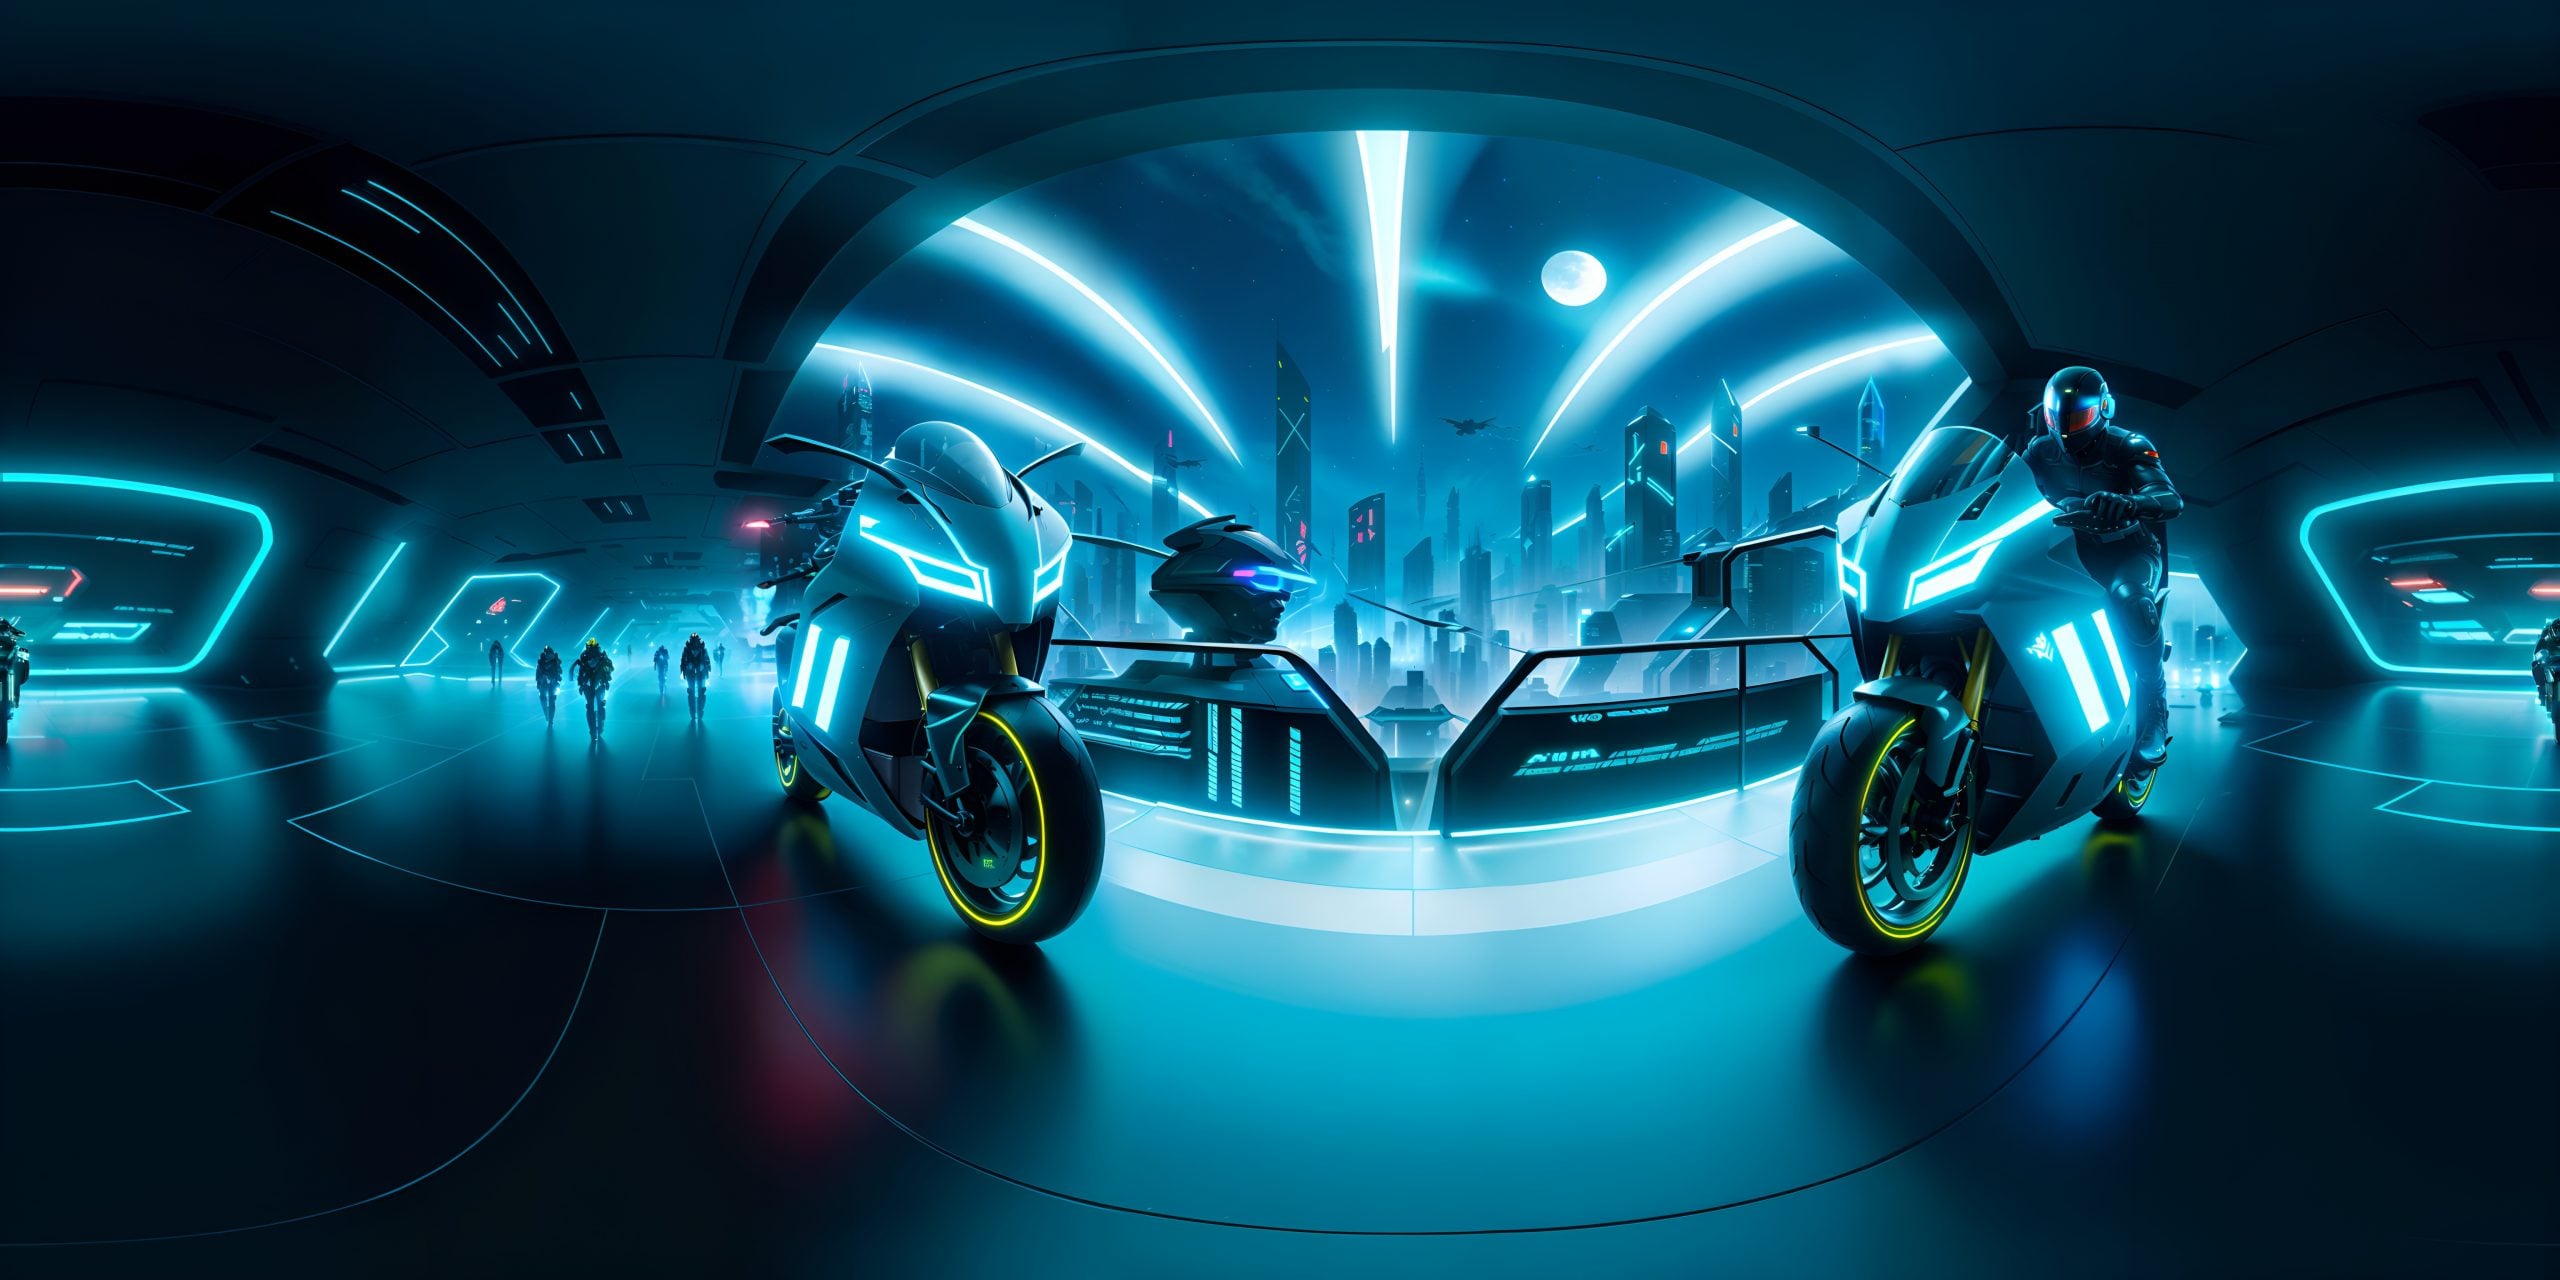
Prompt – Cyberpunk TRON world with TRON motorcycles and illuminated grid floor
Style – SciFi
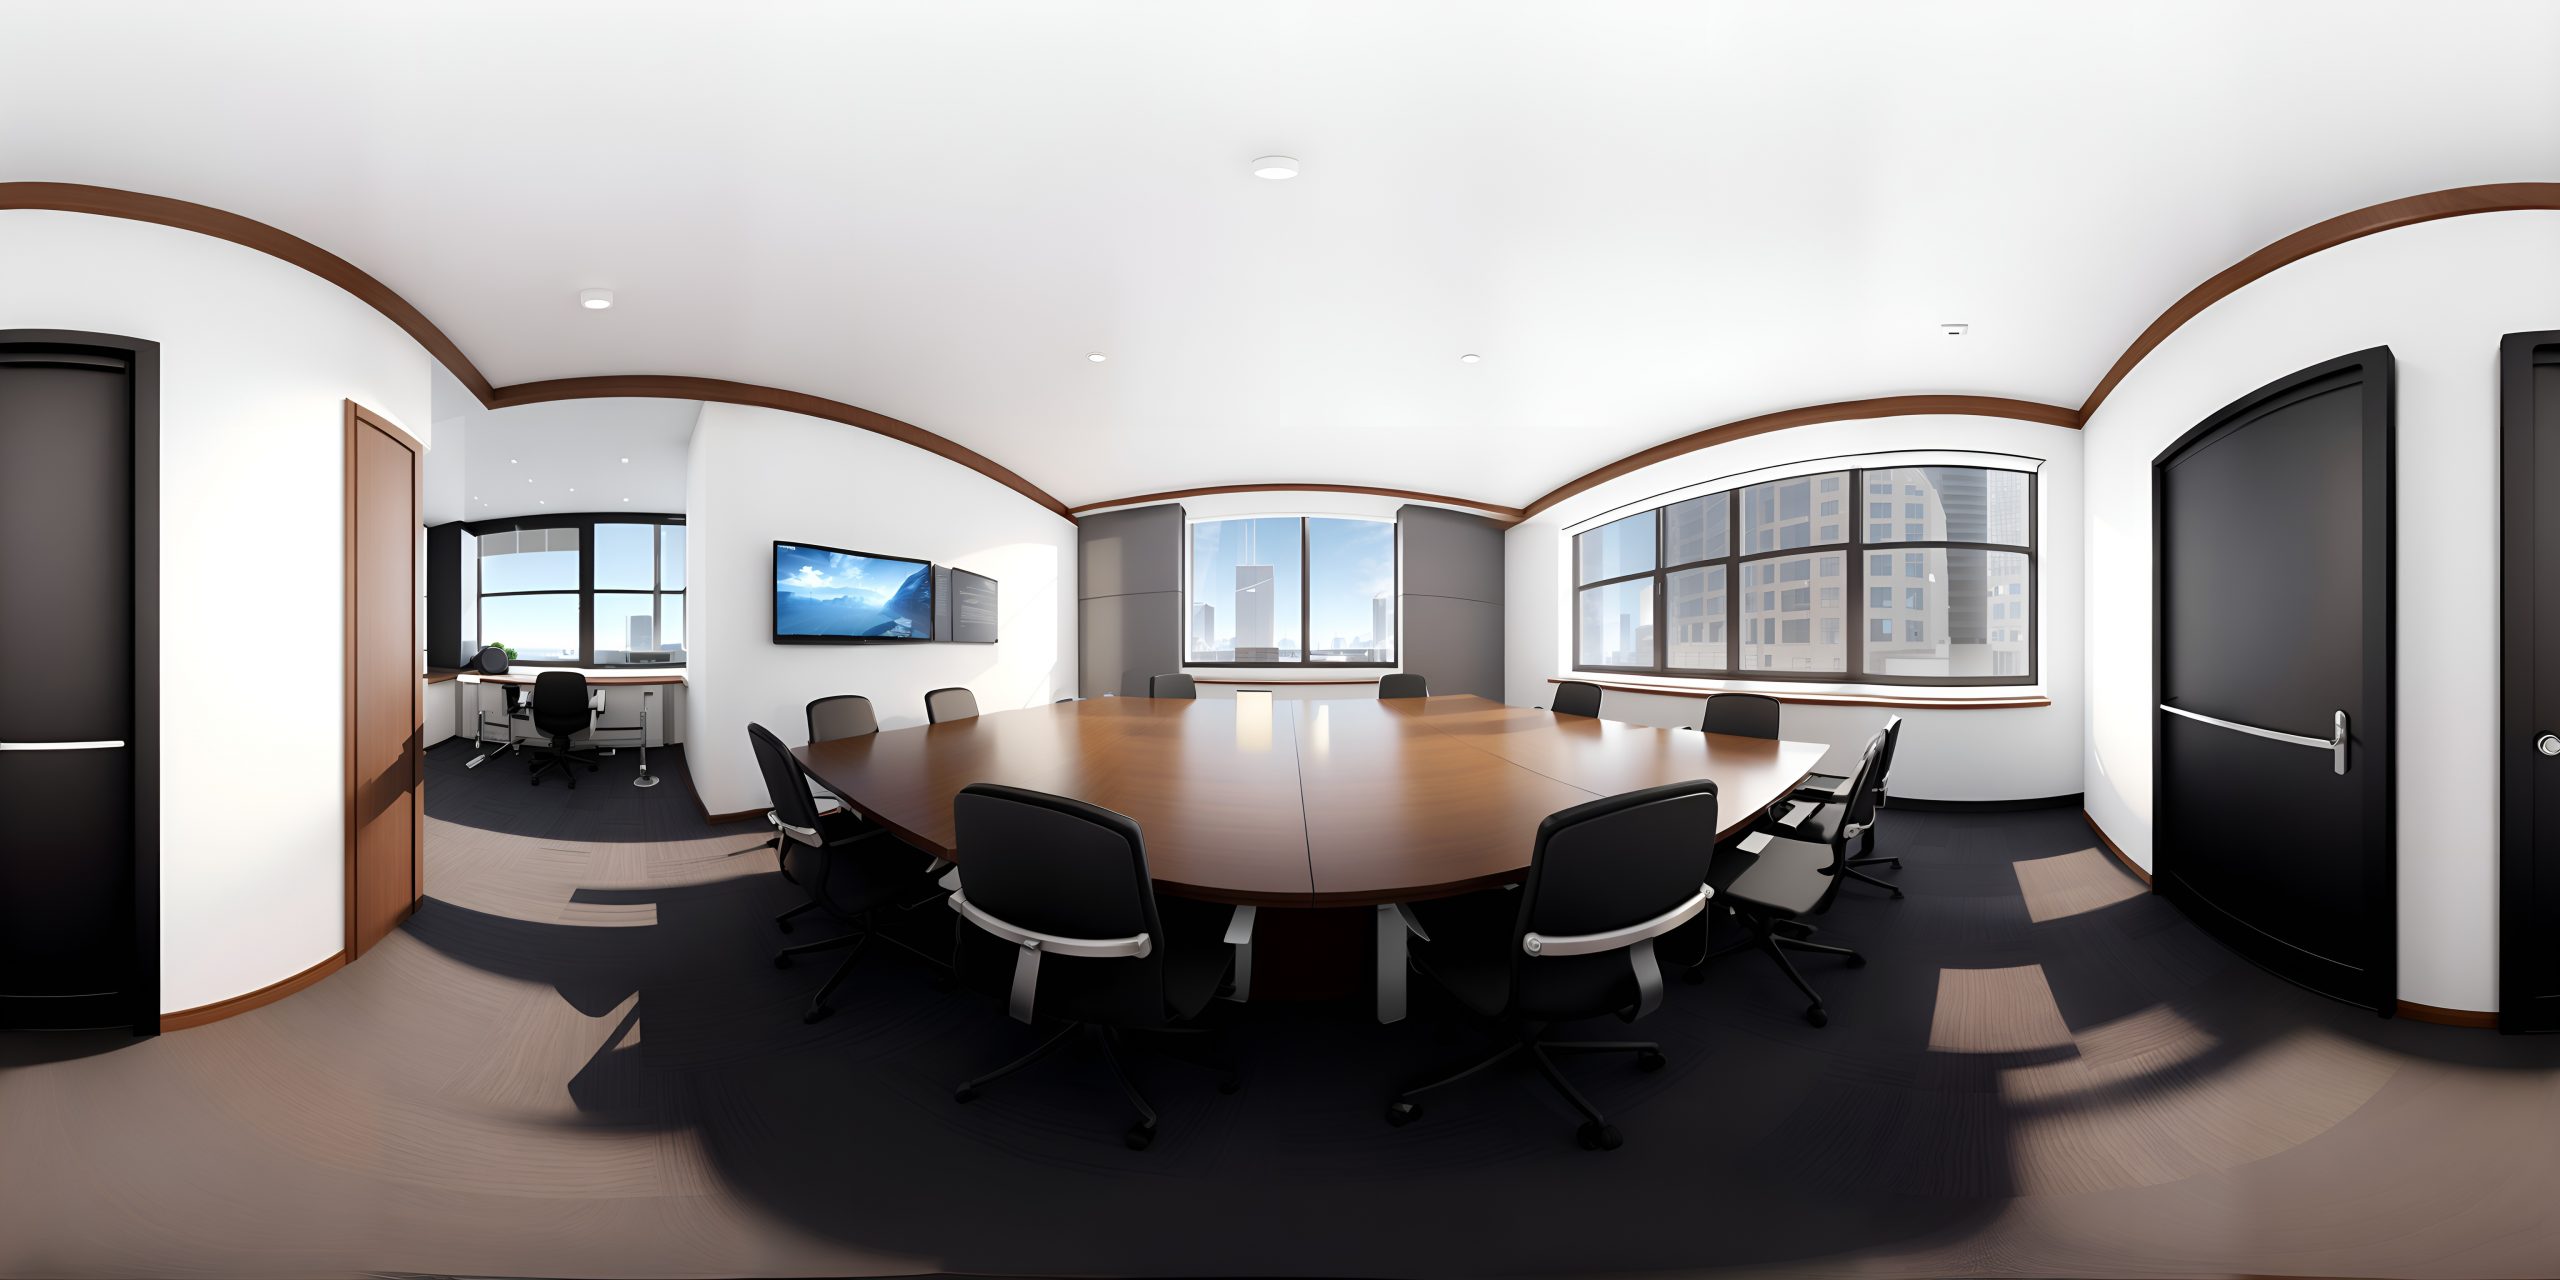
Prompt – Office meeting room table. Empty conference room.
Style – Realistic
Prompt – Empty warehouse. Large space with skylights and volumetric light rays.
Style – Advanced (No Style)
![]()
![]()
Additional Skybox AI Features
With subsequent updates, the Skybox AI has gotten some very nifty new features that give you further control over your HDRI creation. A toolbar on the side of the interface now lets you use a brush tool to create preliminary shapes, guiding the AI to make exactly what you have in mind, rather than give you something totally uncontrolled and haphazard. This helps you create a 360° HDRI that exactly fits your needs. A brush and eraser tool help you create an overall skeleton that the AI will then use as its input. You can draw your own buildings, roads, lampposts, tables, etc. to get exactly the right kind of HDRI. Viewing options also let you choose to view your HDRI in a spherical or cube grid, and with or without a ground plane, to give you a better sense of how your HDRI will look in rendering software like KeyShot. Finally, while downloading your HDRI, you can now even download a Depth Map of it to use in other 3D rendering software for a more immersive environment that reacts well to camera movements and creates that parallax effect that makes your renders look absolutely real!
How to import the environment in KeyShot
Once you’ve generated your environment, browse around within Skybox’s interface using the cursor to make sure it has no warped edges, imperfections, or random errors. You can download the image using the download button, and save it to your desktop.
To use the environment in KeyShot, open the software and first set your scene by adding a model to it (or hit Ctrl + 8 to generate a sphere). Once the model’s in place, head to the Project tab on the right side (hit Space if you can’t see it) and click on the Environment button. Click the ‘Create Blank Environment Map’ button to create a new map. Head to the HDRI Editor and select ‘Image’ from the list of options. Select the image you generated and KeyShot automatically turns it into an environment. You may need to play around with the scale, brightness, or contrast in the Settings tab. When you’re happy with how the environment looks, rename your New Environment by right-clicking on it. Then, head back to the HDRI Editor and press the Save To Library button.

Where to find the options on the KeyShot 11 interface
A Better, Faster Workflow with KeyShot
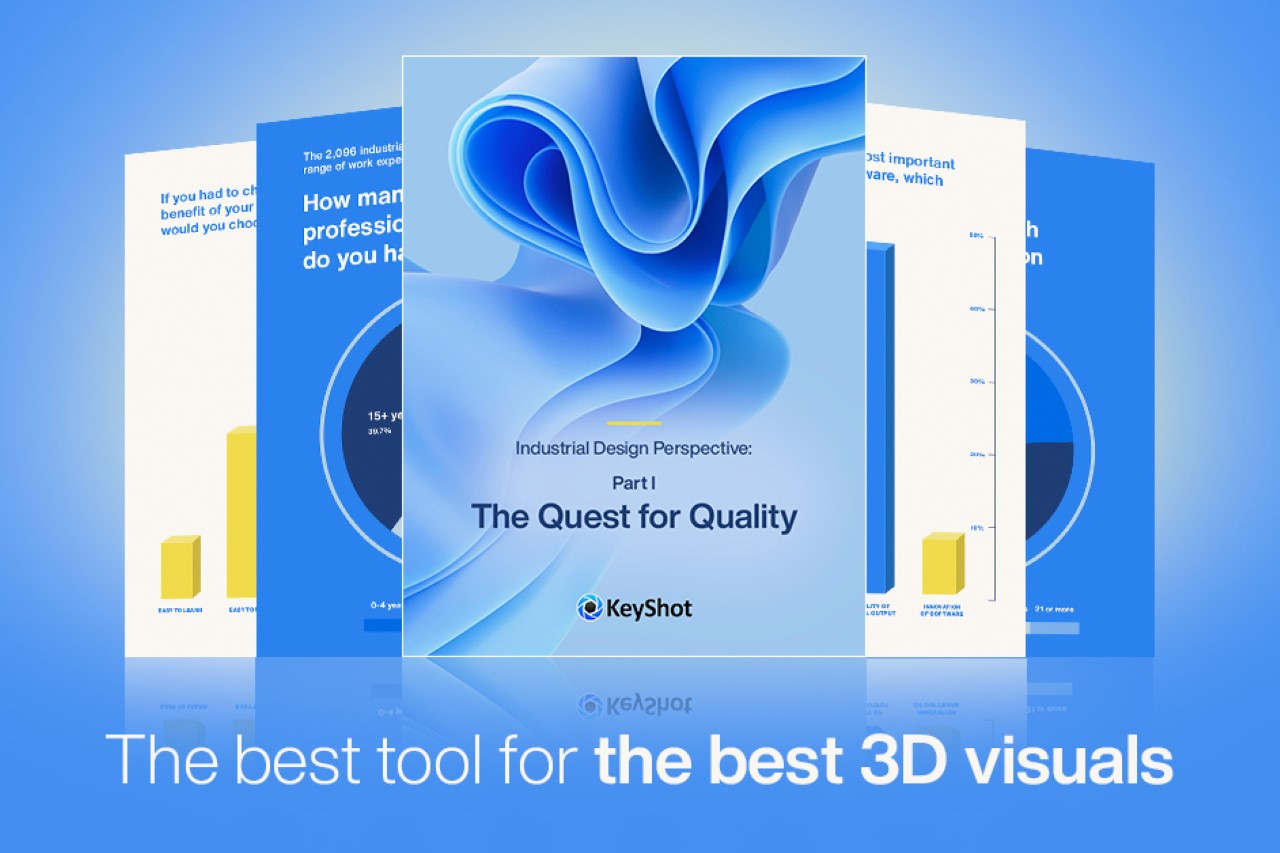
Earlier this year, KeyShot surveyed thousands of industrial designers and leaders to understand which rendering software they preferred, and the reasons behind it. 88% of them mentioned that KeyShot “provides the best 3D rendering quality output” in comparison to other software, that either take time and expertise to master, or just don’t have the same quality standard as KeyShot.
“KeyShot allows you to maximize your artistry and accuracy, providing expansive materials and color libraries along with in-depth tools that allow you to tweak the smallest details,” the report says. The software gives you instant yet advanced control over all your parameters like lighting, environment, material, and even color, thanks to partnerships with companies like Pantone to make their libraries a part of the KeyShot rendering software. Click on the report below to learn more.
Free KeyShot 2023 Trial: Download Now | Free KeyShot Report: Download Now